Step by Step Introduction of Figma to Elementor Using UiChemy
A complete walkthrough of exporting a Figma design as an Elementor template with UiChemy.
Figma has become a go-to design tool for many designers, offering a collaborative and versatile platform. With UiChemy, you can take your Figma designs and export them as an Elementor template to use directly in the Elementor website builder.
Recommended Server Requirements
Make sure your server has these settings for a smooth template import in Elementor:
- PHP Time Limit (
max_execution_time): 300s - PHP Memory Limit: 256M
- PHP Upload Limit: >100M
- max_allowed_packet for MySQL: >5MB
You can make these changes yourself, or contact your hosting provider to increase the PHP time limit, memory limit, and upload limit.
Required Elementor Settings
- Make sure the free Elementor plugin (3.11.5 or above) is installed and activated.
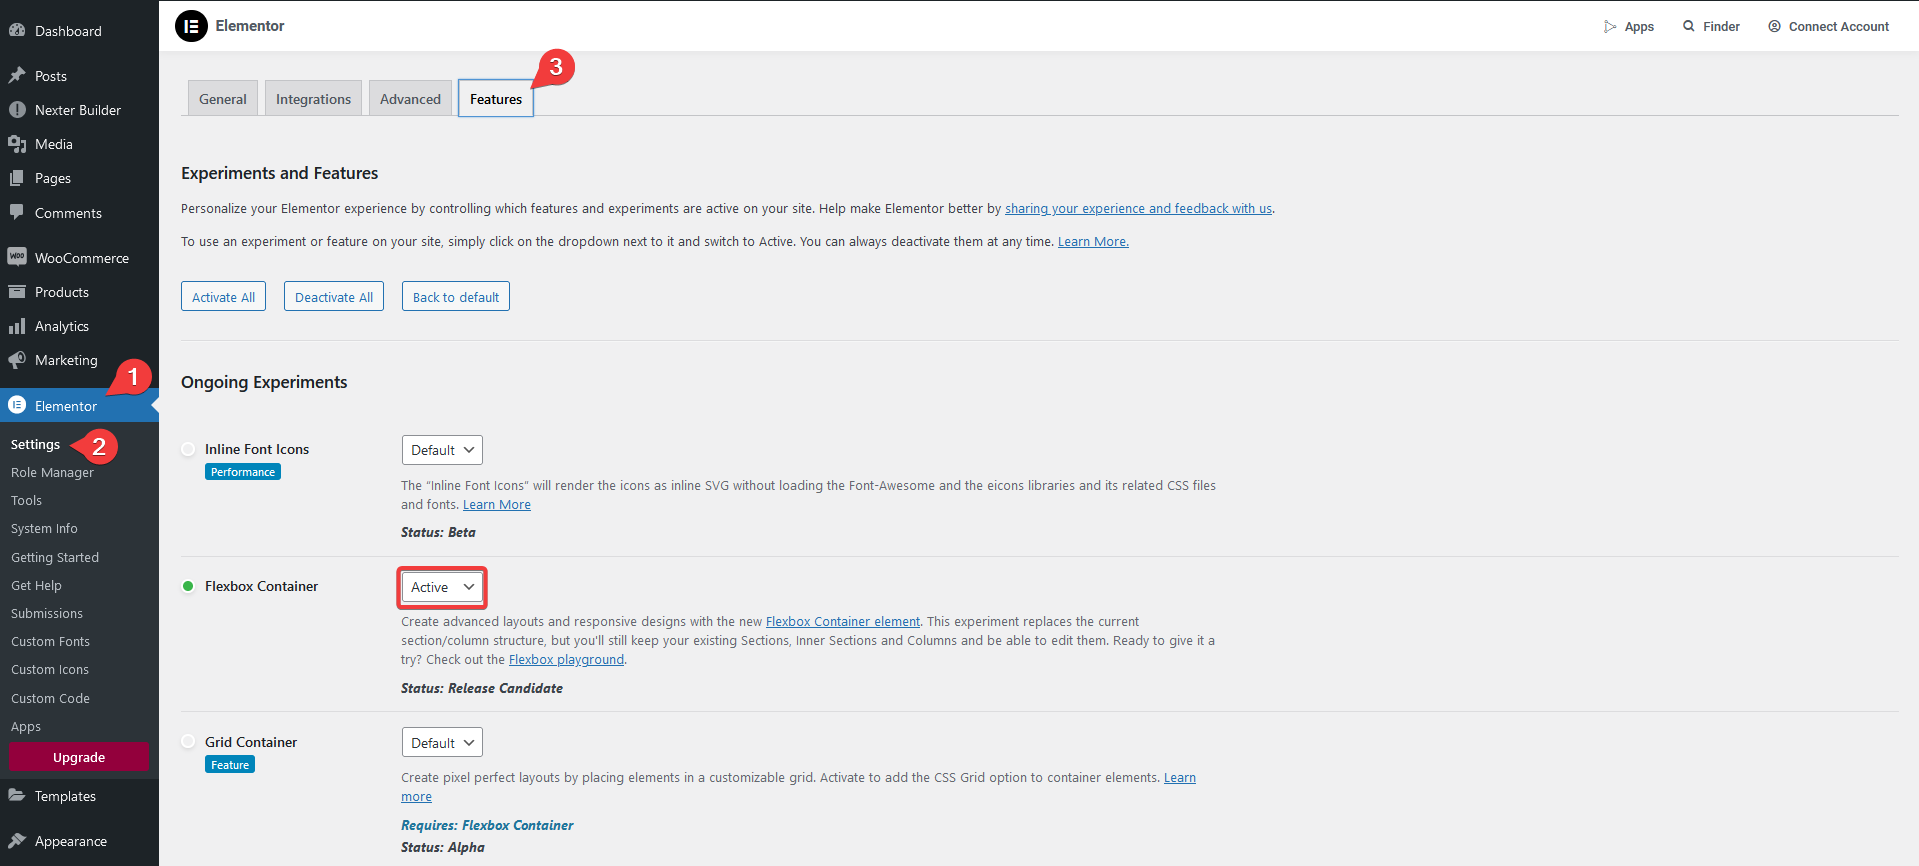
- Before importing, enable the Elementor Flexbox container: go to Elementor → Settings → Features, select Active from the Flexbox Container dropdown, and save.
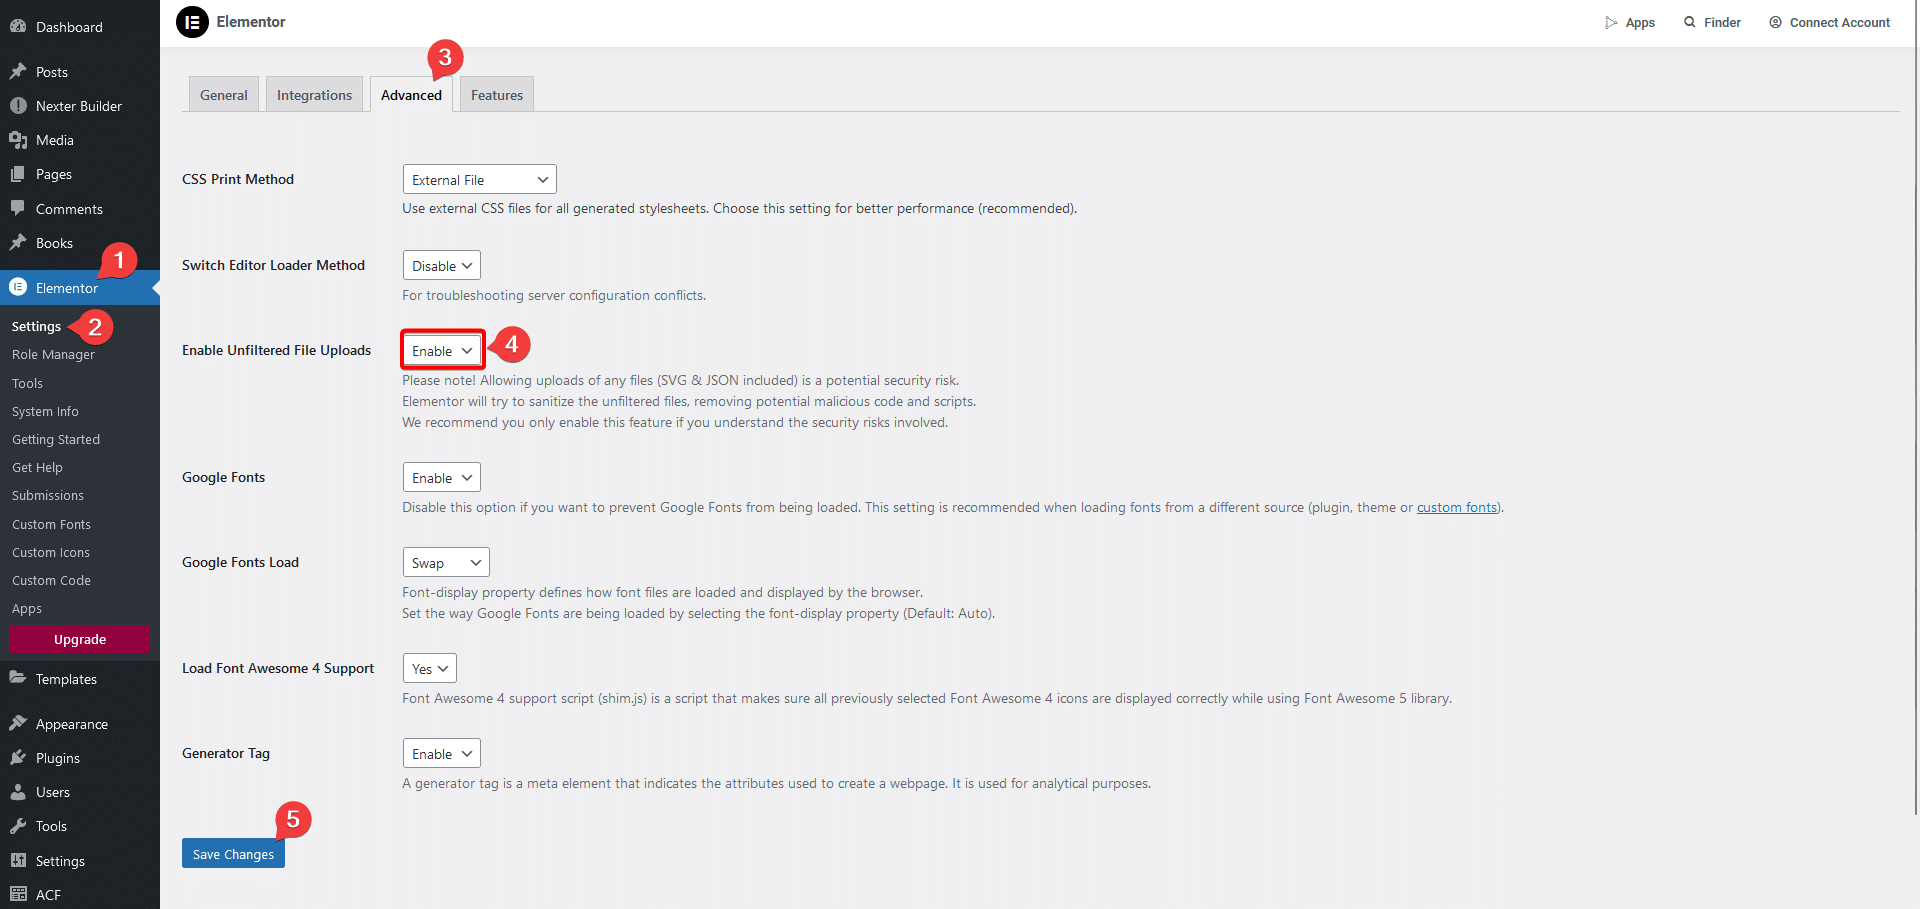
- Make sure SVG file upload is enabled: go to Elementor → Settings → Advanced, select Enable from the Enable Unfiltered File Uploads dropdown, and click Save Changes.
Export Design from Figma
- Go to Resources → Plugins, search for UiChemy, and click on it, this opens the UiChemy plugin interface. Log in to your account.
- Select the section of the layout you want to export, select the top frame to export the entire layout, or a specific section to export just that section.
- Choose Step by Step Method or Quick Conversion. See How to Export Figma Design to Elementor for the full step-by-step breakdown.
- Click Convert on the final screen.
Based on the frame you selected, UiChemy automatically decides the export method, shown on its own Export Method screen. If you selected the top frame, you'll see two options:
- Copy to Clipboard, directly copy and paste the design into Elementor
- Direct Import, export the design directly to your WordPress site, or download and upload the template manually
If you selected a specific section instead, only Copy to Clipboard is available.
Pick an option and click Import to continue. A "Converting..." progress screen shows while your design is processed.
If your Credits balance is too low for the conversion, you'll see a "You're out of credits" message here instead. See What happens if I run out of Credits mid-conversion?
How to Use Copy to Clipboard
- Click Copy to Clipboard, once the design is copied, you'll see a green tick.
- Open the page or template where you want to paste the design, in the Elementor editor.
- Right-click on the dotted-border section, select Paste from other site, then press Ctrl + V to paste. The design is added to your editor.
How to Use Direct Import
Make sure you've installed and activated the UiChemy plugin on your WordPress site.
- On the Export Method screen, choose the Direct Import tab.
- In the Select Site dropdown, click + Add Site under the Import tab.
- In the Direct Import popup, paste your Connection Link, then click Connect. You'll see a success or error message depending on whether the details are correct.
- Once connected, your website URL appears in the Select Site dropdown. When the dot beside it turns green, open the layout under Import Settings.
- Choose New to create a new page or template, or Existing to update one you already have. Choosing Existing reveals two more options: Replace an existing page or template entirely, or Add-On to it, plus a Replace To dropdown to pick which one.
- From the Export To dropdown, select the template type, Page, Elementor Templates, or Nexter Templates. Nexter Templates shows Not Installed if the Nexter theme isn't active on your site.
- Click Next.
- You'll see a thumbnail of your layout. Click Import to start, an "Importing" progress indicator shows while it uploads.
- Once uploaded, preview a layout by clicking the button beside it.
For Elementor Templates and Nexter Templates, you also need to select the template type.
How to Use Manual Download (For Elementor and Bricks)
- On the Export Method screen, choose the Download JSON tab.
- You'll see a thumbnail of your layout with a download icon. Click it to download that layout individually, or click Download to save it as a JSON file.
We recommend using Direct Import instead, to reduce manual work.
Copy Code Method (For Gutenberg)
When using the Figma to Gutenberg plugin, you'll see a Copy Code option instead. Make sure you've installed and activated both the UiChemy and The Plus Addons for Block Editor plugins, then:
- Click Copy Code.
- On the next screen, click the copy icon beside the page.
- Go to your WordPress dashboard and add a new page.
- Click the purple Plus Paste button at the top.
- In the popup that opens, press Ctrl+V, the template is imported onto your page.
Import Template in Elementor
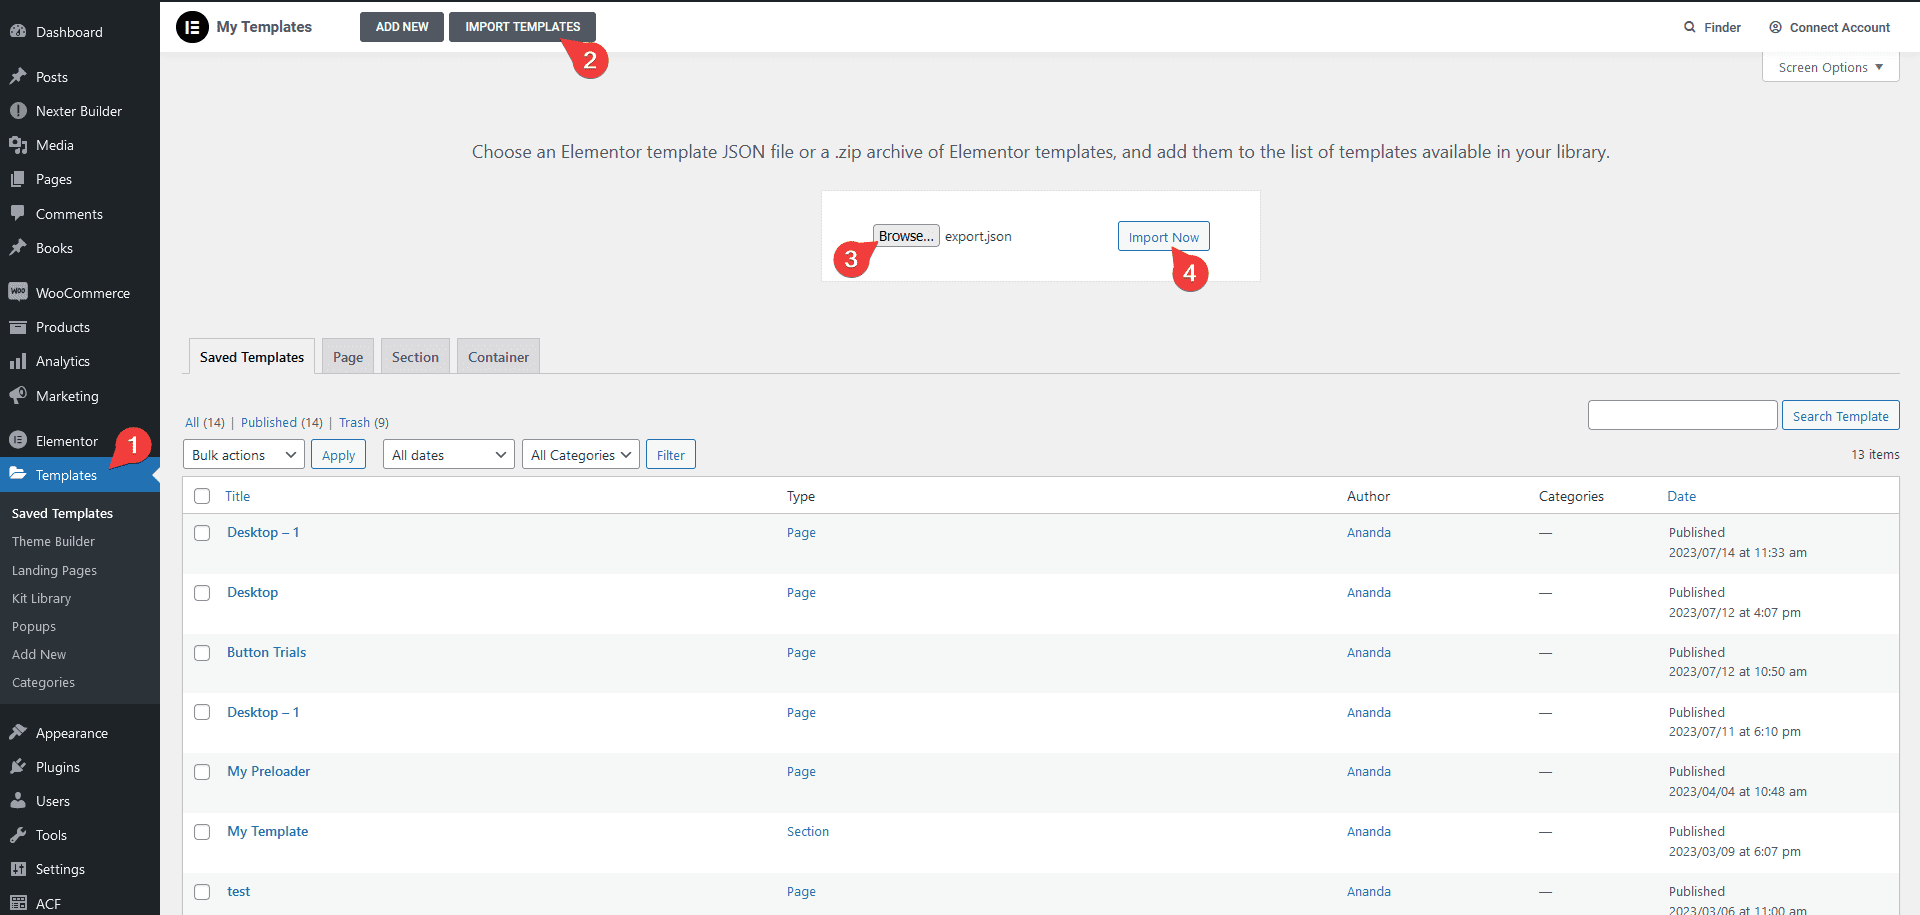
- From the WordPress Dashboard, go to Templates and click Import Templates.
- Click Browse, select your exported template, then click Import Now. Depending on your design's complexity and file size, this may take a moment.
- Click View to check the imported template.
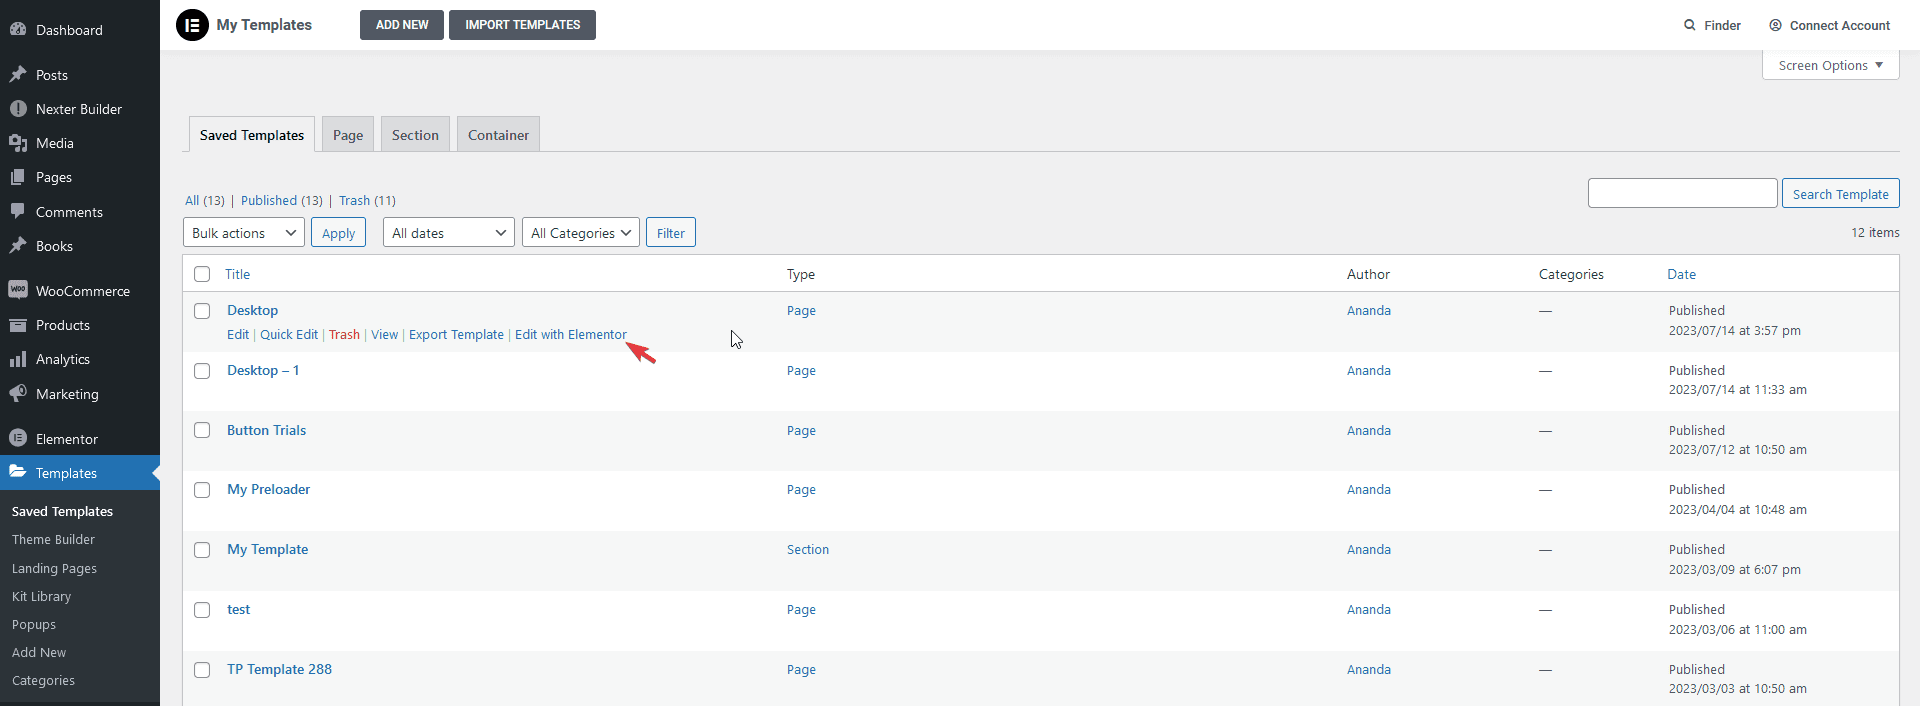
- Open the template by clicking Edit with Elementor.
- To make sure the layout displays correctly, go to Settings in the Elementor editor panel and set Page Layout to Elementor Full Width or Elementor Canvas (only if you're building a single-page site with header, footer, etc.).
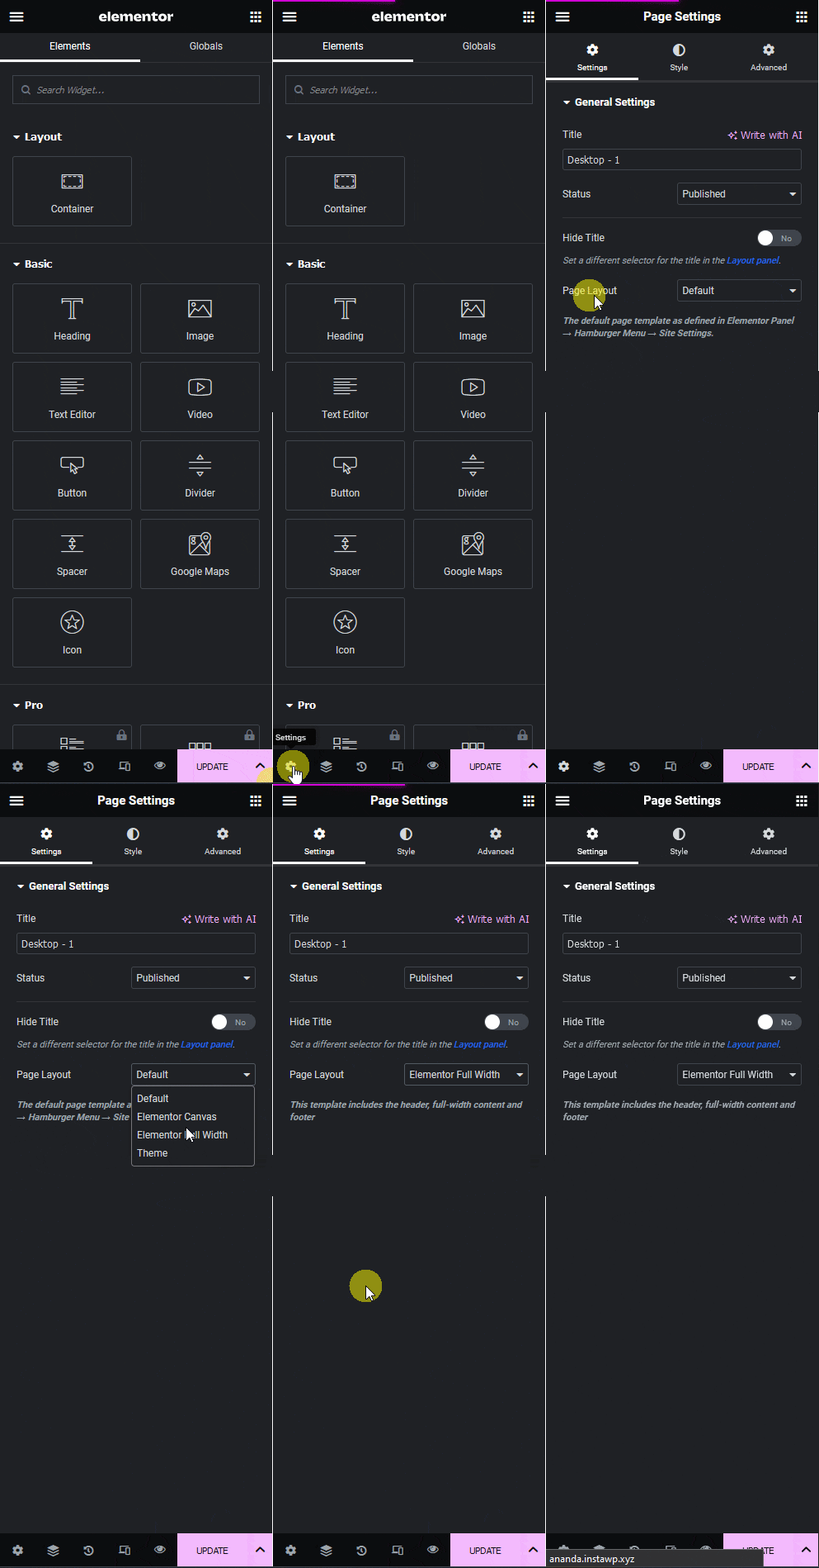
If your layout contains a common sidebar, keep the page layout at default and add the sidebar as a separate template. If your layout contains common sections like a header or footer, create separate templates for them (e.g. using the free Nexter theme) and reference them from your current template.
Use the Template
- Add a new page, save it, then click Edit with Elementor.
- Click the folder icon (Add Template).
- In the popup, go to the My Template tab, find your template, and click Insert to add it to the page.
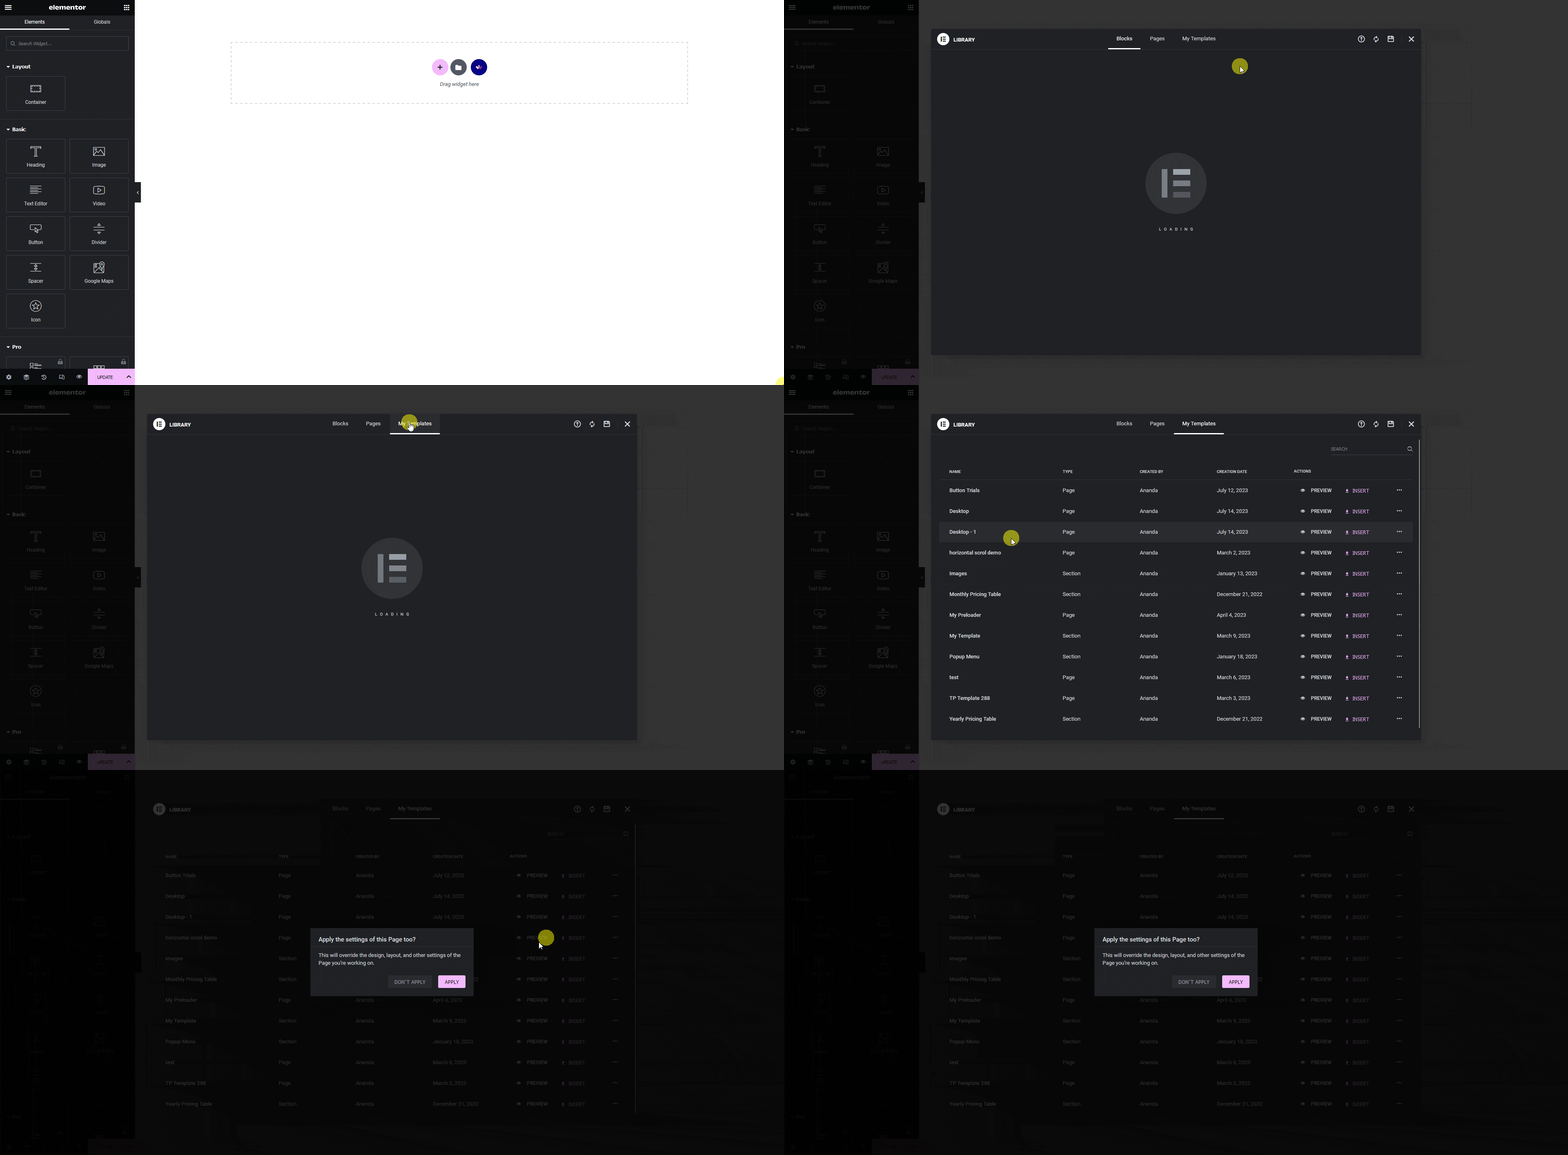
- When prompted to apply the template's settings to the page, click Apply, the page now shares the same page settings as the template.
For any issue, check the troubleshooting documentation.
Frequently Asked Questions
What should I do if the Direct Import fails?
Check that the UiChemy plugin is installed and activated on your WordPress site, and that your Connection Link is entered correctly in the Direct Import popup. A common cause is pasting an old or incorrect link.
Can I use UiChemy to export designs from tools other than Figma?
No, UiChemy only converts designs from Figma.
What are the recommended server requirements for using UiChemy?
A PHP Time Limit of 300 seconds, PHP Memory Limit of 256MB, PHP Upload Limit over 100MB, and MySQL's max_allowed_packet over 5MB.
What is the best method to import a Figma design into Elementor?
Direct Import, it reduces manual work by uploading your design directly to your WordPress site.